Download Free Software Owon Oscilloscope Hack
 Jan 05, 2012 There’s a new YouTube Music web player for desktop! No thanks Check it out. Find out why Close. Super Deyisme 2012 KAK PALOJNA Bakililar Klubunda Gorush Perviz Resad Cavid Vuqar Balabey.
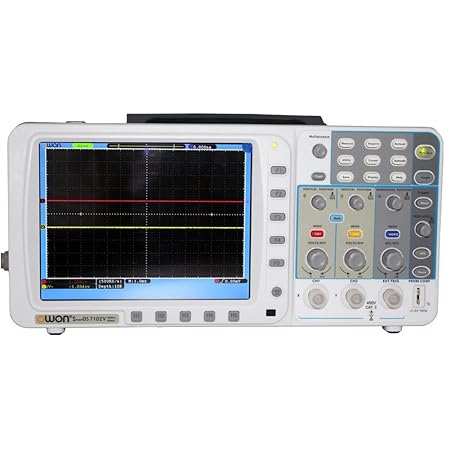
This tutorial will guide you through the basics of using an oscilloscope, it is meant for someone with very little or no experience with electronics or oscilloscopes. There are many types of oscilloscopes out there, and each is a little different, so I'm going to focus on the essential components that are found in all oscilloscopes and are the most useful when getting started. Oscilloscopes are useful for looking at very fast changes in voltage over time, things that we could not measure with a multimeter. Usually when you make a measurement with an oscilloscope, you will see a line that stretches from one side of the screen to the other; this line is actually a graph of voltage vs time (fig 2), where voltage is measured along the y axis and time along the x. Oscilloscopes come in two varieties: analog and digital(I'll be using a digital scope in this tutorial). The controls on both types are basically the same; be aware that the digital scopes may hide some of there controls in a menu on the LCD display instead of using knob or button.
Oct 5, 2016 - It's a nominally a 50 MHz scope, but there's a software hack that can bring it up to 100 MHz. Got the same Rigol DS1054Z you got and the Owon SDS7102 as well. Digital cameras hacks, downloads hacks, drone hacks, Engine Hacks, Engineering, Fail of.
All oscilloscopes have some basic controls in common, be sure you can identify these controls on your oscilloscope: - at least one input where an oscilloscope probe (also called a coaxial cable) can be attached (be sure you have one of these cables) - screen with a grid overlay- this grid is useful when you want to make measurements using the scope - volts/div- this control lets you change how many volts are represented by each vertical increment of grid overlay on the screen. Basically, it allows you to zoom in and out along the y axis.

- time/div- this control lets you change how much time is represented by each horizontal increment of the grid overlay on the screen. It allows you to zoom in and out along the x axis. - vertical position/offset- lets you move up and down in the y direction - horizontal position/offset- move left and right - trigger level- this is a tool that allows you to stabilize your waveform on the screen, I'll get into the details later on in this tutorial See the images above for examples. Turn on your oscilloscope.  If nothing is plugged into the oscilloscope you should to see a flat line, this means that the voltage of the input is not changing over time.
If you see a line that is not flat, try disconnecting the probe from the oscilloscope. If the screen is blank try the following (remember all oscilloscopes are a little different, don't worry about pressing buttons if you're not sure, you won't break anything): - my oscilloscope is a dual channel scope which means it has two inputs. As shown in figure 2, pressing the 'channel 1' button causes that input to display on the screen in yellow. Pressing it again will cause it to disappear.
Pressing channel 2 will display that input in blue. Your oscilloscope may only have one input (no channel buttons), or it may have more than 2. Analog scopes will not display separate channels as different colors, it's all green. - you may be zoomed in tight on some blank space, try turning the volts/div knob counterclockwise to zoom out, also try turning the vertical position control until you get a flat line centered in your screen. - make sure you scope is not in x y mode Use the volts/div and vertical position controls to center your horizontal line in the screen and set the volts/div to ~1V and time/div to ~1ms to start. Once you connect to your signal, you should see the flat line turn into a waveform of some kind. Adjust your time/div so that you can see separation between the oscillations, adjust the volts/div and vertical position so that the waveform oscillates within the limits of the screen.
Your wave may be hard to see and appear somewhat unstable, as shown in figure 2. If it is not, turn the trigger level dial until this happens (if your oscilloscope has more that one channel, make sure the trigger is set to the appropriate channel, on my scope this can be set by pushing the trigger menu button and following the directions on the lcd menu, look for the words 'trigger source'). While turning the trigger level dial, you'll see a trigger level indicator move up and down the screen (the small yellow triangle on the right side of the screen in the images above).